Paint
Like a Pro
Part Seven: Painting Faces
by Mike McVey
![]()
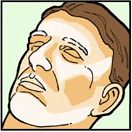
Last month's article looked at the techniques and colors used to paint skin tones. This month we're going to continue on the same theme and take a look at faces. In painting terms, the face is the single most important part of a miniature -- the focal point. Pick up a miniature and look at it. I guarantee your eyes will be drawn to the face, just as they are when you look at someone in real life. I said in last month's article that a miniature will stand or fall on the way the flesh is painted, and this is doubly true of the face. So I always paint the face last, because for me it brings the miniature to life. The different factions in D&D Chainmail offer great scope when it comes to painting faces -- everything from tiny halflings to brutish ogres -- and all are tackled in the same basic way. I'm just going to cover basic Caucasian tones, but the technique can be modified easily for different racial types.
| When painting faces, start with a mid-flesh color. Aim for neat and even coverage of the whole face. Thinning the paint slightly will help. |
 |
The Basics
Painting faces, as with much of miniature painting, can be as simple or complex as you want to make it. When you first start out, one of the biggest mistakes you can make is to be overambitious. The best advice I can give to anyone new to the hobby is, "keep it simple and neat," and this applies nowhere more than in painting faces.
Base coat: When I'm painting skin tones on a miniature I tend to start with a fairly deep base color, but with faces I like to lighten this slightly. I use a mix of a basic flesh tone with chestnut added to give it a little depth. Make sure your paint's consistency isn't too thick or it will fill in the fine detail. Your goal is to get an even covering.
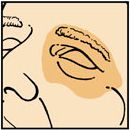
| Apply shading to the recessed areas: around the nose, in the eye sockets, under the lips and cheekbones, and around the hairline. |
 |
Shading: I use a wash for the shading: It's quick and good at picking out the sculpted detail. You'll probably need to experiment to get the right color for this. I always use inks for washes, as the colors are far deeper and cleaner than paint. Try a mix of chestnut with a little brown added to deepen it and knock off the orange edge. The wash should be thinned slightly with water and applied sparingly to the whole face. You aren't aiming to drown the miniature, so apply just enough to run into the recesses and pick out the detail. If you add too much ink, the excess can be "drawn off" with a clean, dry brush.
Highlighting: Before applying any highlights, make sure the wash is completely dry. When doing simple face-painting, I use a two-stage highlighting technique. In the first stage, I paint the base color onto all the raised areas of the face, leaving only the deeper areas shaded by the wash. This neatens up the flesh tones and starts to create some depth. Then I use a straight flesh tone as the second highlight color to pick out the most prominent areas on the face, such as the bridge of the nose, brows, cheekbones, and chin. You can further lighten the color if you choose, adding more white to the flesh tone and painting it onto progressively smaller areas.
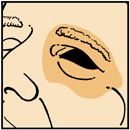
| Apply highlights to the raised surfaces: along the bridge of the nose, across the brow, on the cheekbones and chin. |
 |
The Details
By now the face will look pretty good, but you still haven't tackled the things that will give the miniature character and really bring it to life: the mouth, and more especially, the eyes. When painting fine details, make sure the paint's consistency allows it to flow freely from the tip of the brush, and that you don't have too much paint on the bristles. If the paint is too thin, or you have too much on the brush, it will flood onto the model. If it's too thick, it won't flow at all.
What you do with the mouth really depends on how the miniature is sculpted. If the mouth is closed, all you need to worry about is the bottom lip. Don't bother with the top lip (unless you want the figure to look like it's wearing lipstick). I use a mix of chestnut with a tiny spot of red and simply paint it onto the most prominent area. If this doesn't stand out enough, add a line of shading below the lip and in the crack of the mouth.
| Paint the eye sockets a very deep flesh color so the eyes will stand out. |
 |
An open mouth means there's a little more work to do. If the tongue is showing, paint it the same color as the lip. If teeth are showing, paint uppers and lowers with a line of white. Pick out individual teeth only if they are sculpted that way -- otherwise you'll get a strange, gap-toothed look. Some miniatures, especially large humanoids and monsters, have larger teeth that look strange if painted pure white. I like to paint these with a mid-tan color and then highlight up to white. This technique makes the teeth look more like tusks.
Painting eyes seems to instill more fear in miniature painters than anything else. But when it comes down to it, the process is really not that hard. Here are the two secrets to painting eyes:
(1) Always use a good brush. A brush that doesn't come to a fine point cannot produce attractive results. I use a 00 pure sable for all fine detail work.
(2) Practice. As with most things, practice makes perfect.
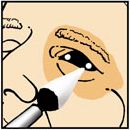
| Next, paint the entire eye black. Hold the brush sideways to the eye, so that the tip of the bristles comes in from the side. |
 |
There are a few methods for painting eyes, some simple and some complex. I use the same technique on every miniature I paint. The process actually sounds like the reverse of what one might expect: I paint the eye black, then add a tiny dot of white at either end. This method may seem more complex than painting the white and dotting in the pupil, but in fact it's far easier to control the eye's shape and you never get that wide-eyed staring look. In effect, you're painting the whole eye and shading around it in one go. Painting the black first also creates more contrasts with the face and makes the eyes stand out further.
Getting the eyes even and level on both sides presents the greatest challenge, especially as the nose gets in the way of the left eye (or the right if you're left-handed). I recommend holding the miniature upside-down when painting the left eye. Painting the oval shape of the eye is easier than you might think, as the tip of a fine brush is just about the right shape. Hold the brush slightly flat to the front of the model rather than at right angles as you normally would. That way, the shape almost creates itself. Practice on old miniatures until you get the hang of it.
| Finally, add a tiny white spot at each end of the eye. |
 |
When the basic black shape is dry, add a tiny dot of white on both sides with the tip of the brush. The dots need to be just inside each end of the black oval.
Framing the Face
To make the face really stand out from the rest off the miniature, add some deep shading all the way around it. This may be around the hairline, or between the face and a helmet if the miniature has one -- it's just important that you visually separate any areas adjoining the face. I generally use deep brown for this step, but if there is a helmet, I'll use black. If the miniature has a beard, try to choose a color that creates contrast with the skin and makes the face stand out.
That's really all there is to painting faces! Of course, you can take the process much further. It just depends on how practiced you are and how much time you are willing to spend. When I'm painting display-standard miniatures, I happily spend three or four hours on each face, carefully applying seven or eight layers of highlighting and three or four stages of blending.
All of last month's points about choosing tones and colors that reflect who or what the model represents are even more relevant when it comes to the face. You can achieve all sorts of interesting and evocative effects by using different colors. Try adding a little blue under the eyes to give a haggard or sinister look, or a little red blended into the cheeks and nose for a robust appearance. You can add make-up to female characters (or male for that matter!), tattoos, or tribal war paint.
Of all the different aspects of miniature painting, the face is one that really warrants extra care and attention. Put thought into what you're doing, practice the techniques, and you'll be paid back tenfold.
![]()
Now,
what are you going to paint?
Check out the
latest selection of D&D miniatures in our
online store!