Paint
Like a Pro
Part Six: Painting Skin Tones
By
Mike McVey
![]()
One of the most useful weapons in the miniature painter's armory is the ability to paint flesh tones convincingly, and in many cases a miniature's appearance will stand or fall on how the skin is portrayed. It's a subject that you can't ignore -- all of the D&D Chainmail factions contain at least some miniatures with skin to paint. Even the minions of Ahmut include living creatures, and a few of the dead ones have decayed and rotting flesh. Drazen's Horde has a wide variety of skin tones to deal with, from Goblins to sallow-hued Ogres.
So you just can't avoid painting skin tones. With a little sensitivity to the subject, the way the flesh is painted can lend considerable character to a miniature -- be it a pale-skinned elf wizard or a ruddy faced dwarf. This month we will look at some easy ways you can bring real character and life to your miniatures.
|
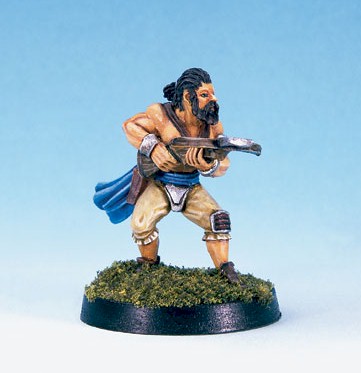
Tanned
colors lend a weather-beaten look to the skin on this Human Marine.
|
 |
Considering Color
The colors you choose are of considerable importance to the finished effect. Think of it this way: It really doesn't matter how well you execute the highlighting and shading of flesh areas if the colors and tones are incorrect -- the finished effect won't be right. Skin tones really are an area of miniature painting that requires thought and subtlety.
Take a moment to really look at the miniature you are about to paint. Look at its race and even its class. Light tones, for example, would look far more appropriate for a wizard's skin than that of a grizzled warrior. And these distinctions hold true not only for humans -- other races can be treated in the same way. Just a few minutes' thinking time can bring so much more life to your miniatures.
In a previous article, I talked about using reference when painting your miniatures. This practice proves especially useful when it comes to flesh tones. First, look at the racial description in the Monster Manual for a couple of lines to get you started. Then examine any artwork you can find that matches what you are working on. (I find that paintings are more useful than photographs because the different tones are easier to distinguish and the effects are more exaggerated.)
Study the range of tones the artist uses on the flesh to achieve a certain look. Obviously, you are working with a far smaller canvas, but there is a lot you can learn and apply to your miniatures. You will find there is a big difference between the light, clean tones of an elf and the grimy, unhealthy pallor of an orc. The value of references doesn't stop there, though -- I have lots of pictures pinned to the wall above my work desk that I refer to constantly.
|
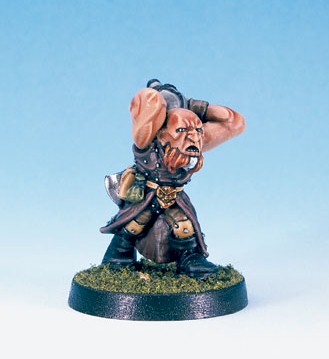
Ogre
skin can range in color from brown to dull yellow. This model achieves
sallow coloration by the addition of yellow and ochre to the base
color.
|
 |
Practicalities
It's easy for me to tell you to consider the effects you want to achieve, but how do you actually achieve them? Let's look at some examples. We'll start with a standard Caucasian skin tone, as it's a good basis from which many variations can be achieved. I use a basic three-stage process: base coat, shading and highlight.
Base coat:
With light skin tones, I like to work over a white undercoat. I use a
deep chestnut color for the base coat, though if it's too bright I add
a little mid-brown or tan into the mix to take the edge off. It's important
too get good solidity of color here: If the base coat is patchy, chances
are the skin will end up looking messy. One advantage of using black for
an undercoat is that it provides good color solidity, but the colors will
end up muted. I pretty much always use a black undercoat for most of the
humanoid races such as orcs, goblins and hobgoblins -- you don't want
a bright, clean look for these.
Shading: The
best way to create basic shading is to use a wash. I use a basic mix of
chestnut with a little brown added to give it depth, and generally water
it down a little. How much the wash is watered down depends on how much
contrast you want. I hold the miniature at arm's length to see how the
skin contrasts with the clothing around it; if the skin doesn't stand
out, I run deep brown into the recess where it meets the area next to
it. This step requires subtlety, but it can make an enormous difference
in the impact of a miniature.
|
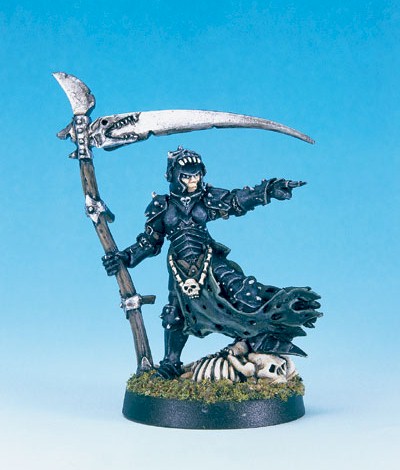
The
face on this Death Cleric has been painted in pale tones to contrast
with the dark armor.
|
 |
Highlighting: Because the base coat is quite dark, most of the work is done with the highlights. I add a little of the base color to a standard flesh tone, to give it a little more depth, and paint this color over most of the exposed skin areas. I only leave the base coat showing in the deepest recesses of the muscles, and where the skin meets the surrounding areas. The rest of the highlight colors are created by adding white to this color mix -- I generally use two or three highlight colors on mid-tone flesh, and the highlights are applied to the contours of the muscles. Try not to make the highlights too harsh -- remember skin is soft and matt, so the highlights need to represent this.
Variation
The description above is the basic formula I use to paint the flesh on almost all my miniatures. By altering this formula slightly I can get some really great effects. Try adding a little green (and I mean a little) to the base color -- you will find that it really takes the edge off the brightness and can enable you to get some very realistic looking tones. Add a bit more and you have a great color for painting zombies and ghouls! Small quantities of purple and blue added to shading colors yields a vivid bruised effect.
Altering the basic formula can also distinguish different races. Dwarf skin is ruddy and tanned, so try adding a spot of red to the base color and keeping the highlights a little more muted. Elves are pale skinned, so mix flesh tone into the base coat and take the highlights a couple of stages lighter than normal.
|
Dwarf
skin looks best if given a slightly ruddy coloration. Just add a
little warm brown to the base color.
|
 |
Some of the humanoid races need special color mixes that can't be derived from this base. Orc skin is a warm gray: A mix of dark grey with a little brown and deep red added (just a spot --you don't want it to look pink) is just about right for the base color. Build up highlight tones by adding standard flesh color to the mix. This gives a far more natural look than adding white or light gray. Gnolls have deep green skin; work it up from a black base coat. Try to keep the overall effect dark, with subtle, natural-looking highlights. As with orc flesh, adding standard skin color to the highlight mix creates a more natural look.
Of course, there are more variations than I have discussed here, but all share certain similarities. Just remember that you're trying to create the impression of a natural organic surface. You don't want it to look hard or artificial, so keep the colors subtle.
The key, as with other miniature painting techniques, is experimentation. Don't get stuck in the rut of painting the flesh the same way on every model. Be brave and try something new. You might mess up a couple figures, but as soon as you get one right you will transform what would have been an ordinary miniature into something with real character.
![]()
Now,
what are you going to paint?
Check out the
latest selection of D&D miniatures in our
online store!