Paint
Like a Pro
Part Four: Shading and Highlighting Basics
by
Mike McVey
![]()
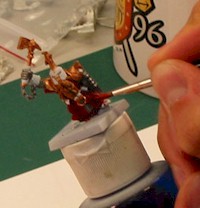
In last month's "Paint like a Pro," we started to look at the practicalities of painting your miniatures --how to hold the miniature and apply the paint. When you first start out, one of the most important things to concentrate on is neatness: getting a good, even coat of paint onto the right areas without overlapping or patchy colors. This month, we're going to move on and show how to add a little more depth and realism to your miniatures.
When you look at someone's clothing, you see that where light hits the surface the colors are lighter, and the areas that are in shade (such as creases and folds) are naturally darker. Because miniatures are so small, the effects of natural lighting are minimal. The areas in question simply aren't large enough to cast any real shadows; the result is rather flat-looking colors. So we artificially paint these lighting differences onto the model -- in simple terms, you paint lighter colors onto the areas that would catch the light, and deeper colors into the folds and creases. These steps are called highlighting and shading, and are without doubt the most important techniques to master.
|
The Base Coat
|
 |
The Base Coat
First, apply the base coat: the flat color over which the highlight and shading colors will be applied. The base coat should be approximately the color that you want to achieve; the addition of highlighting and shading should just add the illusion of depth without altering the color. (If you add too much shading over the base coat, the overall effect darkens the color, while too much highlighting lightens the overall color.) For example, if you are painting the skin on a hobgoblin fighter, the base coat should be roughly the color you want the skin to look -- in this case, a rich brick-red.
Mixing Shade and Highlight Colors
If you are adding shade and highlight colors to an area, it means you will need three degrees of the same color: the base coat, the highlight tone, and the shade tone. Select a deeper tone than the base coat for shading, a lighter tone for highlights. In the case of the hobgoblin fighter above, a deep brown would work well for the shading, with a dull orange for the highlights. When all of these colors are painted on, the overall effect should be the same brick red that you used for the base coat -- but it will have far more depth and realism to it than a flat color.
|
Mixing
Shade and
Highlight Colors |
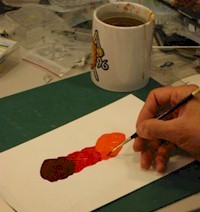 |
The easiest way to get three versions of the same color is to mix them yourself. For example, if I was painting a cloak blue, I could get the highlight color by adding white to the base color. Just put a bit of the base color on your palette and mix in a little white until you achieve a lighter shade of blue. (Take care to wash all the blue out of your brush before putting it in the white pot!) Most colors can be lightened with white, or in the case of warm colors, yellow.
Mixing shade colors presents more of a challenge. Shade colors are deeper tones of the base color, rather than darker colors, and these can be very hard to mix. You could just add black to the base coat color, but in most cases it makes the tone muddy and unattractive, and in some cases the result is disastrous! So in the case of the blue cloak, you need to add a deeper blue to the base color to produce a shading tone.
Shading
|
Shading
|
 |
|
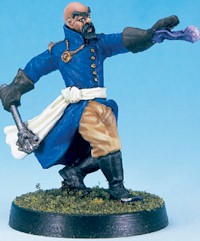
This
Thalos Wizard is a great example of
how highlight and shade colors are applied. Look how the coat has been shaded with a deeper blue, and the tops of the creases have been picked out with a lighter shade. |
In general, shade colors are applied to the recesses and crevices of a model -- the areas that would be in shadow if they were on a real object. I work on the assumption that the deeper the fold or crease, the deeper the shade color. A good rule of thumb for miniature painting is to paint the most inaccessible parts first. So when the base coat is dry, start with the shading. Mix up your shade color and carefully apply it to the recesses of the area you are painting. This will immediately start to create some depth. Use a mid-size brush; I find a 0 ideal. When the paint is dry you can use the base color to tidy up the shading by painting over it where necessary.
Another, very easy, way to add shading to a miniature is to use a black undercoat. This creates fairly basic, but sometimes very effective, shading. Simply leave a little of the undercoat showing in the very deepest areas of the miniature. This trick really works only when used between different areas of the miniature -- for example, where a tunic meets a cloak or the edges of a belt. A thin line of the undercoat left showing in these areas creates far greater contrast between them, achieving a real feeling of depth.
Using a black undercoat works well to create contrast between different areas, but not to achieve a subtle shading effect on a larger area. There are lots of different ways to apply more subtle shading -- one of which, washing, we will discuss next month. But when you first start out, the best thing to do is simply paint the deeper tones on with a fine brush.
Highlighting
|
Highlighting
|
 |
|
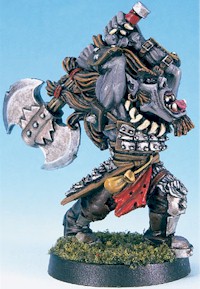
Skin
is painted in the same way as any
other surface. The warm gray skin tones of this Orc Berserker have been given depth and realism with the addition of subtle shading and highlighting. |
When light hits a surface, it naturally catches on the most prominent areas -- such as the tops of folds and creases and the edges of belts and straps. We represent this effect on miniatures by accenting these areas in a slightly lighter tone of the base color. It's really just the opposite of adding the shading: Mix up a lighter tone of the base color and apply it to the raised surfaces of the area you are painting. As with so many aspects of miniature painting, there are no hard and fast rules -- it's really a matter of judgment where to apply the highlights, or how light the color needs to be. Again, highlights can be tidied up with a little of the base color if your brush strays. Always remember to make sure the colors are dry before applying more paint.
Advanced Techniques
Highlighting and shading are simple techniques but require lots of practice to master. In this article I have talked about the process in its most basic form -- using just one highlight and one shade color. You can create far more subtle results with additional intermediate shades, to achieve a subtle gradation of color from deep to light that gives the illusion of depth. Several different techniques can be used on different parts of the miniature to create more realistic effects. We'll look at some of these, such as drybrushing and washes, in next month's article.
![]()
Now,
what are you going to paint?
Check out the latest selection of D&D miniatures in our online
store!
© 1995-2002 Wizards of the Coast, Inc., a subsidiary of Hasbro, Inc.
All Rights Reserved.
Wizards is headquartered in Renton, Washington, PO Box 707, Renton, WA 98057.