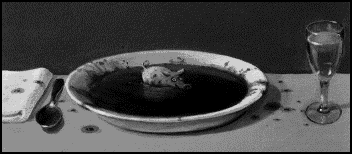
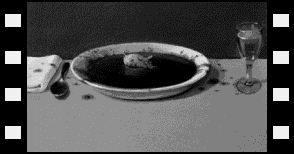
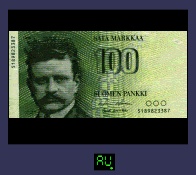
The smiling pig as the director wanted us to see it, the aspect ratio being 2.35:1.
This article assumes you are familiar with the terms NTSC, PAL and SECAM. If not, here is the short short version:
| Date | Changes Made |
|---|---|
| 2005-01-27 | Page moved to iki.fi. |
| 2002-06-07 | Added links section. |
| 2001-02-07 | Added a comment about the shooting process of The Good, The Bad and The Ugly. |
| 2001-01-24 | Added comment about video camera source material to Chapter 3. |
| 2001-01-04 | Slight rewording. |
| 2000-12-30 | Rewrote Chapter 4 and created Chapter 5. Now also 16:9 enhanced video is discussed properly. New pictures. |
| 1998 | New pictures, updated info. |
| 1997 | Updated. |
| 1995-09-23 | First version with pictures published. |
All of the examples in this article are manufactured. All movies shown are in their correct aspect ratio category, but the frames used are not actual movie frames. They are just examples similar to those phenomena that can actually be seen in the movies shown.
In the early days there were many ways to create a wider picture. The most desperate visions even used several projectors in parallel, which was a futile attempt. In those days an important invention was made, anamorphic cameras and projectors (see chapter 2).
The smiling pig as the director wanted us to see it, the aspect ratio being 2.35:1.
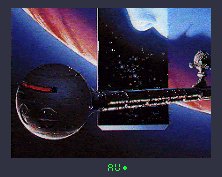
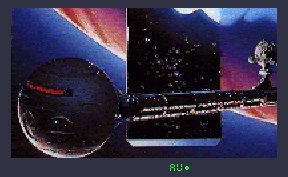
The smiling pig shot anamorphic.
Some movies that have used this technique very well are: The Good, The Bad and The Ugly, the original Star Wars movies, and The Pink Panther Strikes Again. (Slight note: The Good, The Bad and The Ugly wasn't in fact shot in anamorphic, but in an el-cheapo 2.35:1 process called Techniscope. The presentation copies are, however, anamorphic.)
The smiling pig shot with hard matting.
Note:
This method is usually not used for 2.35:1 films, but for 1.85:1
films like The Terminator or Aliens.
The smiling pig shot with soft matting.
This is a very common way of shooting films.
Some movies that have used this technique are: Spaceballs, Silence of the Lambs, Total Recall, Edward Scissorhands.
The smiling pig shot with Super-35.
Some movies that have used this technique are: Abyss, Terminator 2, True Lies, Apollo 13, Titanic (1997).
Notice that Super-35 prints can't been shown in movie theaters. For theaterical prints, one of the three processes mentioned before must be used. In this case, the desired aspect ratio being 2.35:1, an anamorphic print would be the best choice.
Altough the format itself doesn't dictate so, it usually is so that if Super-35 is used, the computer-generated special effects are rendered at an aspect ratio of roughly 2:1, which limits the ways in which a video version can later be made.
With very few exceptions, non-silent films run with a speed of 24 fps (frames per second). However, NTSC video runs at 30 fps and PAL video at 25 fps.
This incompatibility betwen frame rates might look quite distressing, but they aren't all that bad. Fortunately, a frame is not the smallest unit of video timing. The smallest unit is a field, where half of the scanlines of the video image are shown. NTSC has 60 fields/s and PAL has 50 fields/s. For many intents and purposes, fields are much more important units than frames. (For instance, if the source material is shot with a video camera, there are no real whole frames. Instead, every field is from a distinct moment of time. This leads to endless trouble when building 100 Hz televisions and interlace-to-progressive converters, as well as when there is a need to go from one TV system to another. However, as we are mainly concerned of film, this is not our concern for now.)
I found watching one my favourite movies, Pink Floyd's The Wall, to be painful on PAL video because the songs were out of tune and too fast. Otherwise I haven't had problems with the wrong speed of PAL video.
So here's what we do: We take a film frame, and show it for 3 NTSC fields, i.e. 3/60s. Then we take the next film frame, and show it for 2 NTSC fields, i.e. 2/60s. The total time for the original film should be 2/24s = 1/12s, which is exactly the same it took for NTSC to show the same frames (3/30s+2/60s = 5/60s = 1/12s). Now we just continue repeating the pattern.
The problem with this is, that every other film frame is shown for 1/20s, while every other is shown for 1/30s. That makes pans look less smooth than what they did in the movie theatre, or PAL video for that matter. This also leads to the fact that if you have an NTSC VCR with frame advance, you'll see duplicate frames from time to time. With 12" laserdiscs this problem is solved by putting so-called white line codes on the discs that tells the player when a new film frame has begun. DVDs have similar codes put to films, although they are not always at correct places.
If in a nitpicking mood, or if trying to sync video with audio, it is good to remember that NTSC video is not exactly 60 fields/s, but 59.94 for several practical reasons. Thus also NTSC plays films with a slightly wrong speed. The error, however, is only 3.6 s/hour.
First, the film is read through an optical scanner and digitized. Usually it is digitized using some resolution that is way above the resolution of the TV system that is going to be used for final viewing. This way the image may be manipulated without quality loss.
So, what will happen with the video masters next? That depends on the aspect ratio of the program in question.


Some people tend to think letterboxing makes their little TV sets seem even smaller, and they hate it for that. That's why almost all widescreen movies are also available in format that fills the whole old, 4:3 TV screen.
A simple way to make an anamorphic film fit on a TV set is to just leave the anamorphic lense out, and everything in the original picture is stored on video. Unfortunately, all people become thin and distorted, which makes this unpopular and nowadays rarely-seen.
Another way is to focus the video camera on the center of the film screen, and show you the centre of the movie. This is called cropping, and it isn't such a great idea, because you'll miss everything happening in the side ends of the picture. There may be scenes where an empty table talks by itself because the people around the table have been cropped off.
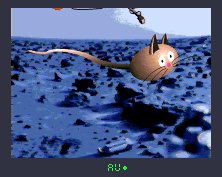
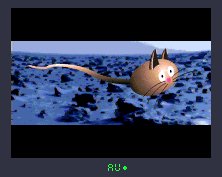
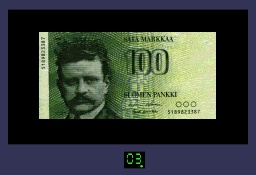
The mostly common way to solve the problem of anamorphic films is the so-called panning and scanning method. The person responsible for film to video transfer is able to show you any part of the screen. This way he may let you concentrate on the action he thought was most important. Of course you won't see anything that person has thought was unnecessary. Be aware, that with a movie shot in 2.35:1 and shown pan & scan full screen, you'll lose over 40% of the original picture area. Some movies don't suffer too much while other become totally inwatchable (The Good, The Bad and The Ugly). Here is an example of a pan & scan picture:
In some countries, like Finland, the subtitles appear superimposed over the picture, which makes the watcher lose more than 50% of the original picture area.
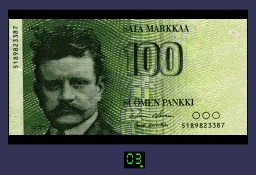
The worst scenario I have seen was someone watching a pan & scan transfer of a film on a 16:9 television set. In this scenario the watcher loses 57% of the original picture area, so there really is not much left of the original cinematography:
If you want to know more about letterboxing widescreen films, MGM´s Letterbox Page is extremely useful.
Here it seems that we really lose picture information with the letterbox version: There is clearly more information on the top and bottom of the screen in the open matted version. Unfortunately this extraneous information is also the problem of opening the mattes. The areas now opened for the viewer can't have important new information compared to the letterboxed release, because the director was only looking at the widescreen area shots when he was making the movie. There also may be some unwanted information present in the opened matte like in my example picture: a microphone at the top of the picture and a Coke-bottle at the bottom of the Enchanted Sea. These days, though, this is not such a problem anymore, because when making the video master, the picture may be zoomed into in critical scenes where unwanted things are shown.
For economical reasons, special effects are usually shot or calculated only for the widescreen part of the movie (typically around 2:1), so in scenes with special effects a full-screen version of an open matte movie is panned & scanned just like an anamorphic or hard-matted movie. This can clearly be seen in T2 or the Back to the Future -movies.

The theatrical widescreen version can easily be extracted from the digital master, and there is also lots of latitude to create an ok pan & scan version by not only panning and scanning, but also zooming on a scene-to-scene basis. Now, let's have a look at how the widescreen and pan & scan versions are extracted from the previous frame:
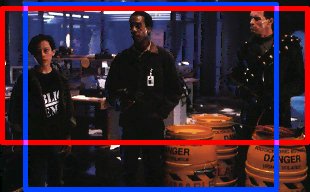
The red square indicates the widescreen area, which is naturally the same all the time, and which was visible to the cameraman. The blue pan & scan area, however, can move in any direction and can change in size, too. In the example the pan & scan frame offers more vertical information and loses little horizontal information, but that is not always the case. This method is nowadays a very popular way to create 4:3 video versions of movies.
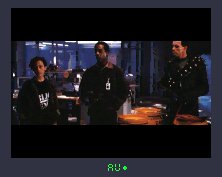
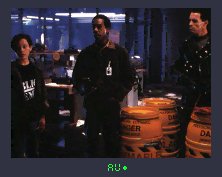
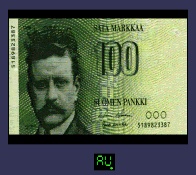
Just to recap what have been told, here are the example pictures of both the widescreen and pan & scan versions:
Although the pan & scan versions are cleaned as much as possible, there still may be some defects present. For instance, in T2, when T-800 and John are going to the telephone booth, you can clearly see in the p&s version that the telephone has been broken all the time and that T-800 only breaks some sort of plastic cover that stops the money from falling to the ground. Also it must be noted, that all special effects for T2 were rendered with an aspect ratio of 2.1:1, and those had naturally to be severely panned & scanned.

Now, we can create different downconversions from this great master. The examples below are Pan & Scan, Widescreen, and Widescreen 16:9 Enhanced. Their relative resolutions are correct.


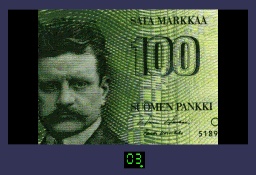
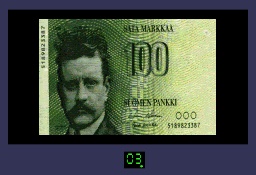
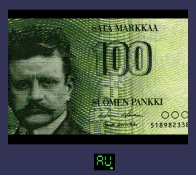
In this way of transferring images, the resolution is kept as high as it can be, but at the cost of missing area. For instance, you cannot tell the serial number of the note, because that information is not available in the picture.
With the new 16:9 set the image is initially surrounded by blackness, but by pressing a "16:9 Zoom" button the letterboxed image is zoomed into so that it fills the whole width of the screen.
The point is that instead of optimizing the video image for a 4:3 TV set, it is optimized for a 16:9 TV set. The picture looks originally as follows.
As you can see, the image is 33% too tall. What shall we do to it?
All 20" or bigger 4:3 TV sets sold in the European Union since 1995 or so have an "anamorphic squeeze" button to compensate for this. All 16:9 sets have a screen mode button, and one of the modes is the native 16:9 mode. By pressing these buttons, we get:
Now, the final pictures look very much the same as the ones for Letterboxed Widescreen. So, what was the point of this complex exercise then?
The point is that nowadays video resolution is no longer dictated by the characteristics of a TV set, if it is a good one. Instead the resolution is dictaded by the characteristics of the source material. This is even more true because of video picture's interlaced line structure; as a result, vertical resolution in video material is more important than horizontal resolution. With a 16:9 enhanced picture, we gain 33% more vertical resolution, which will not only result in a sharper, but also more stable and less flickering picture.
But what if you don't have the "Squeeze" button on your old TV set or you just hate black borders? If you are a DVD player user, you are lucky. In the initial setup menu, you may choose the aspect ratio of your television of three alternatives. If you choose "16:9", you'll get the behaviour as described above. The other two alternatives are "4:3" and "4:3 Pan & Scan". Below are example pictures of how the 16:9 Enhanced DVD will look on a basic 4:3 TV set without the squeeze button:
As you can see, the "4:3 Pan & Scan" operates in such a way that it doesn't change the picture height from the "16:9" setting, but it broadens the picture to correct the aspect ratio. On the DVD there is information that allows the player to pan & scan to the left and to the right depending on the scene. Note, that these options are only available for 16:9 Enhanced DVDs, and not basic Letterboxed Widescreen DVDs.